
This post was originally published on this site.

XAUUSD: Gold Rebounds From 4080. Can Price Recover Toward 4170?
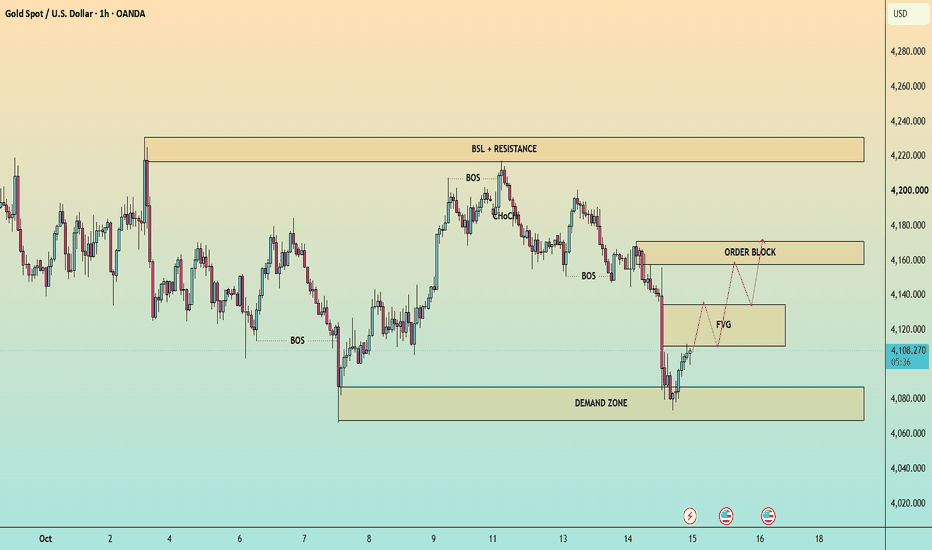
Gold has reached a critical demand zone on the H1 chart. After facing rejection near the 4200–4210 region, XAUUSD developed a bearish continuation, breaking through local structure and dropping sharply toward 4080.
The latest sell-off pushed price into the 4068–4086 demand zone, where buyers have started to respond. Gold has since rebounded toward 4108, but the recovery is still in its early stages.
The key question now is whether this reaction marks the beginning of a stronger recovery or merely a temporary retracement before sellers regain control.
For now, I am watching the 4108–4130 FVG as the first important decision area, followed by the 4157–4170 Order Block. Above these zones, the 4215–4230 resistance and buy-side liquidity (BSL) remain the major upside barrier.
Here is how I plan to approach the next move.
🟢 SCENARIO 1 — BUY THE FVG RECLAIM
My initial bullish scenario is based on the reaction from the 4068–4086 demand zone.
Price has rebounded from this area after an aggressive bearish displacement. This suggests that buyers are responding, but the recovery still needs confirmation before I consider a continuation toward higher levels.
The first zone I am watching is the 4108–4130 FVG. If price holds above the lower boundary and develops a bullish M15 CHOCH or MSS, the recovery could extend toward the next resistance.
BUY ENTRY: 4110–4115, after bullish confirmation
STOP LOSS: 4098
TAKE PROFIT 1: 4130
TAKE PROFIT 2: 4150
TAKE PROFIT 3: 4165
I want to see a successful retest or a clear bullish structure shift before considering this setup. If price falls back below 4108 and fails to reclaim the FVG, the recovery may lose momentum.
🟢 SCENARIO 2 — BUY THE ORDER BLOCK RECLAIM
What if gold continues recovering through the FVG?
The 4157–4170 Order Block is the next important area on my chart. It previously acted as a region of selling pressure, so price may react when it returns.
If buyers reclaim the FVG and push through the Order Block with strong bullish displacement, I will watch for a pullback that holds the broken zone as support.
BUY ENTRY: 4160–4165, after a confirmed breakout and retest
STOP LOSS: 4148
TAKE PROFIT 1: 4180
TAKE PROFIT 2: 4200
TAKE PROFIT 3: 4220
This setup requires more than a temporary wick above resistance. I want an H1 close above the relevant part of the Order Block, followed by a successful retest.
If price is rejected sharply from 4157–4170, I will avoid assuming that the bullish recovery can continue uninterrupted.
🔴 SCENARIO 3 — SELL THE FVG REJECTION
Although buyers have responded from demand, the broader H1 structure remains vulnerable after the recent bearish displacement.
If price retraces into the 4108–4130 FVG and fails to reclaim the zone, the imbalance could become an area of renewed selling pressure.
I want to see a bearish M15 CHOCH or MSS after the rejection, followed by a failed retest.
SELL ENTRY: 4115–4125, after bearish confirmation
STOP LOSS: 4135
TAKE PROFIT 1: 4095
TAKE PROFIT 2: 4080
TAKE PROFIT 3: 4070
The setup is valid only if sellers demonstrate control within the FVG. If price reclaims 4130 and holds above it, the immediate bearish continuation idea weakens.
The 4068–4086 demand zone is particularly important. If price returns to this area, I will watch for another reaction rather than automatically expecting a breakdown.
🔴 SCENARIO 4 — SELL IF DEMAND BREAKS
This is the scenario that would indicate the current recovery has failed.
The 4068–4086 demand zone has attracted buyers, producing the latest rebound. However, if sellers return and an H1 candle closes below 4068, the demand zone could lose its ability to support price.
I would then look for a failed retest from underneath before considering bearish continuation.
SELL ENTRY: 4065–4068, after a confirmed breakdown and retest
STOP LOSS: 4082
TAKE PROFIT 1: 4050
TAKE PROFIT 2: 4035
TAKE PROFIT 3: 4020
A brief wick below demand is not enough to confirm a breakdown. I want to see sustained weakness and an unsuccessful reclaim of the zone.
If price quickly recovers above 4086, I will cancel this continuation scenario and reassess the market structure.
WHAT MATTERS MOST RIGHT NOW?
The H1 chart gives us four important areas to monitor:
4215–4230: Major resistance and BSL. This becomes relevant if gold stages a much stronger recovery.
4157–4170: Order Block and potential selling area. A confirmed reclaim could support further upside.
4108–4130: Current FVG and immediate decision zone. The reaction here should help clarify whether buyers can extend the rebound.
4068–4086: Demand zone and recent swing-low area. Holding this zone supports the recovery thesis, while a confirmed breakdown would expose lower prices.
My preferred near-term scenario is a recovery from demand toward the 4108–4130 FVG, followed by a potential move toward the 4157–4170 Order Block.
However, I am not treating the rebound as a confirmed bullish reversal. The recent bearish displacement remains significant, and price must reclaim the overhead zones before the recovery becomes structurally stronger.
If the FVG rejects price, I will watch for renewed downside pressure toward demand. If demand breaks and the retest fails, the bearish continuation scenario becomes more relevant.
The key is to let price confirm the next direction rather than assuming that the first reaction from support will develop into a full recovery.
All entries, stop losses, and targets above are conditional plans derived from the supplied H1 chart, not active trade signals. They require confirmation from live price action and appropriate risk management.
What is your view? Will gold defend the 4080 demand zone and recover toward 4170, or is the current bounce only a temporary retracement before another bearish leg?
Share your bias below. Let’s compare the key levels and structure we are watching.


